


How To

Wood Finishes Preparation

Nine tenths of a fine finish happen before the first brushstroke. Here, finish by finish and timber by timber, is what cabinetmakers and decorators do before they open the tin - grits, products and drying times included.

Plan my preparation

Start here

Everything happens before the finish

A finish is never better than the surface that carries it. Paint that flakes, oil that stays tacky, a blotchy stain, a lacquer that turns milky: nine times out of ten the cause is not in the tin but in what was done - or not done - beforehand. Timber is a living material: it breathes, moves with humidity, bleeds resin, and every species reacts in its own way.

Preparation answers four questions, always the same. Is the timber dry - under 18 % moisture, 12 to 15 % for interior joinery? Is it clean - free of grease, silicone, wax and dust? Is it sound - knots sealed, splits repaired, old coats removed or keyed? Is it open - sanded to the right grit, neither too coarse nor « burnished » by a grit so fine that oil could no longer get in? The rest of this page simply works those four questions through for the finish you want and the timber in front of you.

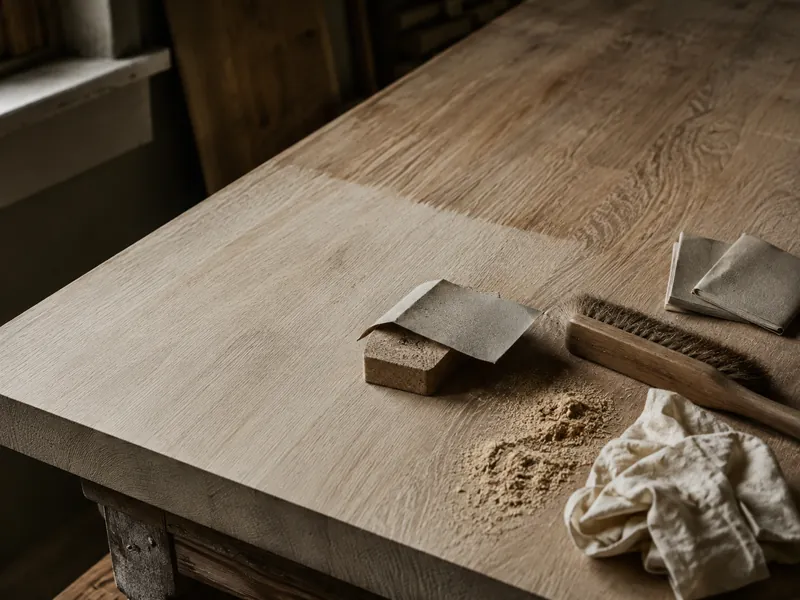
Close-up of a raw oak top being sanded grit by grit, the abrasive paper beside it
Dry, clean, sound, open: the four states of a timber ready for its finish

Your turn

The preparation planner

Choose the finish you want and the timber you have: we compose your roadmap - the steps in order, the final grit, the products, the times to respect and the pitfalls specific to that combination.

The finish you want

The timber to prepare

A generic roadmap composed from our technical sheets: the data sheet of the product you use remains the reference, and a trial on an offcut or a hidden area remains the best advice of all.

The rule of sanding

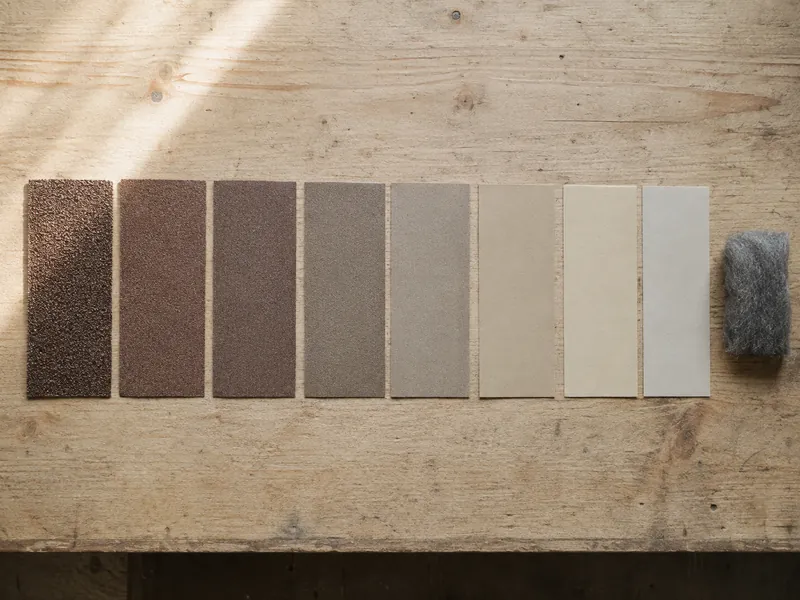
The grit progression

Each grit erases the scratches of the one before - and only the one before. You never skip a grit, never sand across the grain, and you stop at the grit the finish calls for: too fine and the timber closes; too coarse and it drinks and scratches.

40–60
Mechanical stripping
Old floors, thick paint, greyed timber: with a machine, never by hand on a piece of furniture.
80
Roughing out
Flattening, removing plane and saw marks, truing a top. The first grit on rough timber.
120
Evening out
Removing the 80 scratches, levelling the surface. The pivot grit of every progression.
150
Floor finish
Final grit for a floor before hard wax oil: the timber stays open enough to drink the oil.
180
Furniture finish
Final grit before oil, stain, paint or shellac on furniture or joinery. The most useful grit in the workshop.
220–240
Lacquer surface
After grain filler, before a lacquer or varnish; de-nibbing a primer. Smooth as glass.
320–400
Fine de-nibbing
Between coats of lacquer, varnish or gloss: removing dust nibs without cutting into the film.
0000
0000 steel wool
Applying a wax, dulling a shellac two days after the last coat, gentle de-nibbing. Never under a water-based finish: the particles rust.
Eight sheets of abrasive paper lined up from 40 to 400 grit, and a pad of steel wool, on a workbench
From 40 to 400: each grit erases the scratches of the one before, and only the one before

Finish by finish

Every finish has its preparation

Eight families, eight demands. Paint forgives what lacquer reveals; oil needs an open timber that shellac would want closed. Here, for each, is the exact state the timber must be delivered in - and why.

01

Paint - eggshell, satin, gloss

The most forgiving finish - provided it is primed

An opaque paint hides the timber, not its surface flaws. Mylands Multi-Surface Eggshell, Satin and Gloss ask for timber that is dry, degreased, sanded to 180 grit, knots sealed and repairs flush - then the Multi-Surface Primer & Undercoat, tinted in the colour's family, which seals the base, evens out absorption and gives the key. Without it the first finish coat is drunk by the timber and the second only half covers.

The higher the sheen, the higher the demand: an Eggshell (≈ 15 % sheen) tolerates a slight ripple that Gloss will show up like a mirror. Under a satin or a gloss, de-nib the primer with 240 grit, dust with a tack cloth and work in thin coats without going back over an area that is pulling. Two finish coats; 4 to 6 hours between each according to the tin, seven days to working hardness.

See the range

Paint

Final grit
180, then 240 on the primer
Base
Knotting + Multi-Surface Primer & Undercoat
Coats
1–2 primer, 2 finish
Between coats
4–6 h (see data sheet)
Full hardness
≈ 7 days
Application
Synthetic brush, fine foam roller
The classic trap Painting straight onto new timber without primer: the colour « flashes » in patches, and the knots come through yellow by the first summer.

02

Dead matt paint

Absolute matt, even on a door

Multi-Surface Dead Matt (≈ 5 % sheen) is the colour-drenching finish - walls, woodwork and ceiling in one shade, without a break. Its preparation is that of a classic paint: dry, degreased timber sanded to 180, knots sealed, Multi-Surface Primer & Undercoat. Its matt hides the small irregularities a satin would reveal, which makes it the most forgiving finish on old joinery.

The trade-off: so deep a matt washes less easily than an eggshell and marks with rubbing on a handrail or a door edge. Keep it for lightly used woodwork, and take care over the primer - uneven absorption reads, on a matt, as a difference in shade.

See the range

Dead matt

Final grit
180, then 240 on the primer
Base
Knotting + Multi-Surface Primer & Undercoat
Coats
1–2 primer, 2 finish
Between coats
4–6 h (see data sheet)
Full hardness
≈ 7 days
Application
Synthetic brush, fine foam roller
The classic trap Touching up a dry area: on a dead matt, every patch shows. You paint a whole panel in one go.

03

Wood oil

Nourish rather than cover

An oil forms no film: it penetrates. Danish oil, teak oil, pure tung oil, finishing oil or food-safe oil - all ask for bare timber, dry (under 18 %), free of any film-forming finish and sanded to 180 grit at most. Beyond that the pores close and the oil sits on the surface. On an old varnished piece, that means going back entirely to bare wood.

Apply generously, let it penetrate for 5 to 10 minutes, wipe off the excess along the grain - then, after 20 minutes, wipe again everything still wet: this is the decisive step, the one that separates a velvety surface from a tacky one. Three coats at 12–18 hour intervals, and a maintenance coat every 3 to 6 months on a worktop. Oily exotic timbers are wiped with cellulose thinners just beforehand.

See the range

Oil

Final grit
180 maximum
Base
None - bare wood
Coats
3
Between coats
12–18 h
Full hardness
Until water beads
Application
Brush, cotton cloth
The classic trap Leaving the excess to dry « so it nourishes more »: surface oil thickens into a sticky varnish that will have to come off with thinners.

04

Hard wax oil

The floor finish - and for everything that lives hard

Mylands Hard Wax Oil marries the penetration of an oil with the resistance of a hardened wax: floors, stairs, worktops, doors, garden furniture. Its success depends on even absorption: sanding through the grits to 120–150 on a floor, 180 on furniture, never finer; total removal of any old wax, oil or lacquer; vacuum then tack cloth.

A thin, even first coat along the grain, in sections, removing any excess at once; 24 hours; a light de-nib with 240 if the grain has lifted; a sparser second coat. Dry in 6 to 8 hours, walkable in socks after 24 hours, chemically cured in 7 to 10 days - no rugs or heavy furniture before then. The tinted versions (Burnt Earth, Pale Slate, Wenge…) colour and protect in one operation.

See the range

Hard wax oil

Final grit
120–150 floors · 180 furniture
Base
None - bare wood
Coats
2
Between coats
24 h
Full hardness
7–10 days
Application
Floor brush, short-pile roller, cloth
The classic trap An island of old varnish forgotten in a corner: the oil cannot soak in and the pale patch stays visible under the whole finish.

05

Stain, then a clear finish

Colour without protection

A stain brings only colour: it must always be sealed afterwards with a lacquer, varnish, shellac, hard wax oil or wax. And it acts as a magnifying glass on the preparation: the slightest circular scratch, the faintest trace of glue will show the moment the dye touches the wood. Meticulous sanding 80-120-150-180, degreasing with cellulose thinners, perfect dusting.

Three families: water stains, soft and even, which raise the grain (dampen and de-nib first); Light Fast spirit stains, dry in 10 to 15 minutes, non-grain-raising and layerable for depth; Earth Stains, mineral and contemporary. On a blotchy softwood, water stain first. Under a water-based finish, a spirit stain calls for a shellac barrier coat.

See the range

Stain

Final grit
180
Base
Water stain on softwood · shellac barrier under water-based finishes
Coats
1–2, then the finish
Between coats
10–15 min (Light Fast)
Full hardness
That of the finish
Application
Cloth, sponge, spray gun
The classic trap A circular sanding mark invisible on the bare wood, and perfectly visible once stained. Sand with the grain, under raking light.

06

Lacquer or varnish

Professional hardness - on a surface of glass

A lacquer reveals everything. Mylac - water-based polyurethane, single or two-pack - and the Quick Dry varnishes demand a perfectly smooth surface: on open-grained timbers (oak, ash, walnut) as in woodturning, cellulose grain filler first, then sanding to 220 grit. A water-based finish raises the grain: dampen, let dry, de-nib before the first coat.

Two to three even coats, 3 to 4 hours between each, systematic de-nibbing with 220–320 stearated paper to remove dust nibs. By brush, a good synthetic brush and no going back over an area that is pulling. A cool, dry atmosphere - humidity causes white bloom. Light use after 24 hours, full hardness at 7 days; Mylac Extra (two-pack, 2-hour pot life) for bar tops and very heavy traffic.

See the range

Lacquer / varnish

Final grit
220 after grain filler
Base
Cellulose grain filler · Shellac Barrier Seal on a stained floor
Coats
2–3
Between coats
3–4 h
Full hardness
24 h light use · 7 days
Application
Spray gun, synthetic brush
The classic trap Lacquering oak without grain filler: the surface keeps the texture of the pores and will never be the mirror you expected.

07

French polish (shellac)

The highest level of preparation

Shellac is the finish of cabinetmakers and restorers - French Polish, Button Polish, Garnet, Superfine White for pale timbers - and it forgives nothing. Timber sanded to at least 180 grit, pores filled on open-grained species, a warm and perfectly dry workshop: humidity turns it white. If colour is wanted, the timber is stained first - Earth Stain, Nitrostain, water stain.

The traditional method, with a rubber of cotton wool wrapped in lint-free cotton: bodying in along the grain to fill the pores, building the body in circular movements with a drop of raw linseed oil, spiriting off with alcohol alone to remove the lubricant and reveal the mirror. The alternative: 2000 Pale Shellac Sealer with a mop brush, 2 to 5 coats. For an antique patina, dull with fine wire wool two days after the last coat. Entirely repairable: new coats melt into the old.

See the range

Shellac

Final grit
180 minimum
Base
Grain filler · optional stain · 2000 Pale Shellac
Coats
2–5
Between coats
A few minutes (evaporation)
Full hardness
Dull after 2 days
Application
Rubber, mop brush
The classic trap Working on a rainy day: shellac traps the moisture and clouds over with a milky bloom that has to be re-worked with spirit.

08

Wax

The patina - on an already sealed timber

Wax is not a base, it is a lustre. It goes on an already sealed surface - shellac, varnish, paint - or on clean, sanded bare timber, whose patina it will become. Where old, grimy wax is present, Mylands Wax and Polish Remover first: that is what guarantees a clean lustre. Mylands waxes, beeswax and carnauba, toluene-free, clean and polish in one operation.

Sparingly, with a soft cloth or 0000 steel wool, in small circular movements; even out, let a matt haze appear, then buff along the grain with a clean cloth or a horsehair brush. After 10 minutes a second coat can be layered on. The tinted waxes - Stripped Pine, Antique Brown, Dark Oak, Liming - colour old pine, age new timber or lime an oak. One or two applications a year suffice thereafter. Not on a floor.

See the range

Wax

Final grit
180–240, or an already sealed surface
Base
Clean bare wood, or shellac / varnish
Coats
1–2
Between coats
10 min
Full hardness
Buff at once
Application
Cloth, 0000 steel wool, horsehair brush
The classic trap Waxing a floor: it is slippery, marks and cannot be cleaned. A floor is lacquered or oiled.

Timber by timber

Every timber has its character

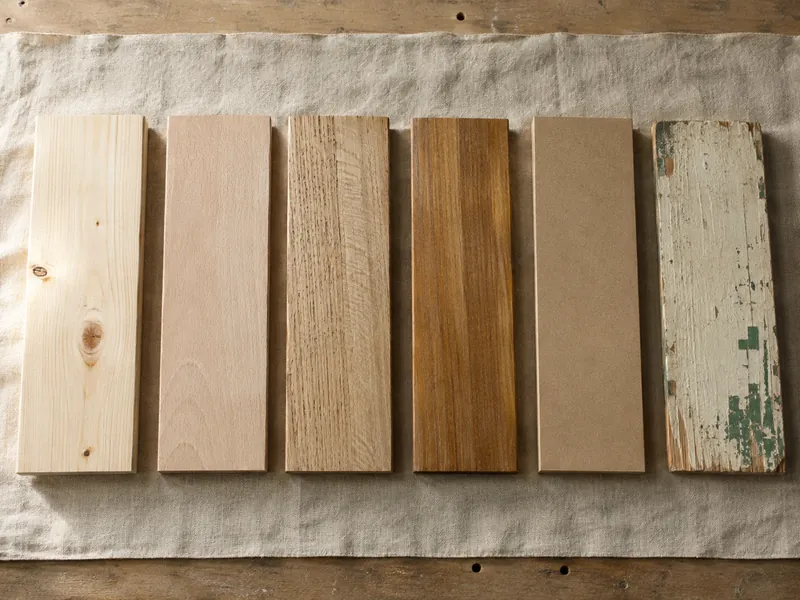
Pine and oak are not prepared the same way, and teak nothing like beech. Six families, their character flaws, and the steps that correct them.

Six raw timber samples side by side - knotty pine, beech, open-grained oak, teak, MDF and a fragment of an old painted door
Pine, beech, oak, teak, MDF, old timber: six characters, six preparations

New softwood

Pine, fir, spruce, larch, Douglas fir, red cedar

Character
Soft, light, inexpensive and full of life: live knots, resin pockets, grain that lifts, an alternation of soft earlywood and dense latewood that drinks stain in patches. Old pine takes on a honey patina restorers prize.
Specific preparation
Check the drying (fresh softwood bleeds for months); Mylands knotting on every live knot and resin pocket before any paint; sanding 120-150-180 without pressing (soft wood hollows); water stain first to even out before a Light Fast; under a water-based finish, raise the grain in advance.
Finishes that suit it
Eggshell or satin paint on primer; Stripped Pine or Antique Brown wax on old pine; hard wax oil on a pine floor; Antique Pine water stain under varnish.
Avoid
Gloss without primer or knotting; spirit stain straight onto bare wood (blotching); oil on timber still bleeding resin.

Close-grained hardwood

Beech, maple, birch, cherry, pear, lime, hornbeam

Character
Dense, homogeneous, with a tight grain that sands like marble: the ideal surface for a paint, a lacquer or a pale shellac. Their flaw: sometimes capricious absorption - maple and birch take stain in patches - and a tendency to scorch with heat.
Specific preparation
Sanding to 220 under lacquer or paint, 180 under oil or stain (tight grain closes quickly); diluted or water stain, in light coats, trial on an offcut; no grain filler needed; on beech destined for the kitchen, food-safe oil or Mylac Extra.
Finishes that suit it
Mylac lacquer on a beech kitchen top; gloss paint on a birch door; Superfine White Polish or Special Pale Polish on maple and sycamore; food-safe oil on boards and bowls.
Avoid
Heavily pigmented dark stains without a trial (patches); wax as the sole protection on a worktop.

Open-grained hardwood

Oak, ash, walnut, chestnut, elm, wenge

Character
Hard, noble, with pronounced figure and wide pores: that is their beauty and the whole difficulty. The open pores must be filled before a lacquer or shellac; oak and chestnut are rich in tannins that blacken in contact with water and iron, and can bleed through a pale paint in rings.
Specific preparation
Sanding 120-150-180 along the grain (scratches lodge in the pores); cellulose grain filler then 220 under lacquer and shellac; never steel wool under a water-based finish (particles → black spots); under a pale paint, a shellac barrier or a tannin-blocking primer; oak is limed with Liming wax.
Finishes that suit it
Hard wax oil on an oak floor; Button Polish or French Polish on walnut and old oak; Liming wax on limed oak; Mylac satin on an ash top; Medium Oak Water Stain under varnish.
Avoid
Lacquer straight on without grain filler; white paint without a barrier coat; damp sponge and steel wool on bare oak.

Oily exotic timber

Teak, iroko, ipe, mahogany, sapele, padauk

Character
Dense, stable, naturally oily: the oils and resins that protect them outdoors are what stop a finish drying indoors. Some - sapele, padauk - bleed their colour into a pale finish. Mahogany is the historic timber of French polishing.
Specific preparation
Sanding 150-180, no finer; degreasing with cellulose thinners just before applying (not the day before: the oil rises again); on the oiliest timbers, very thin coats and longer drying times; under a water-based finish, a shellac barrier; under paint, Multi-Surface Primer after degreasing.
Finishes that suit it
Durax Teak Oil on teak and iroko (garden furniture); French Polish, Button Polish or Garnet on mahogany; Light Fast Antique Mahogany to revive; pure tung oil on an ipe top.
Avoid
Water-based varnish straight onto oily timber (lifting); thick unwiped oil (tacky for weeks); pale wax on a timber that bleeds.

MDF

MDF, fibreboard and chipboard

Character
No grain, no knots, no pores: a perfectly flat surface, made for paint - and two weaknesses. The edges drink everything and swell irreversibly with water; the sanding dust is fine and irritating.
Specific preparation
FFP2 mask and extraction; dry dusting, never damp; edges sealed with two coats of primer (the first slightly thinned), de-nibbed with 240; faces primed once or twice; 240 de-nib; no wax, oil, stain or shellac - a board is painted.
Finishes that suit it
Eggshell, satin or gloss paint on Multi-Surface Primer & Undercoat; Dead Matt for a bookcase drenched in the wall colour.
Avoid
Any penetrating or clear finish; water on bare board; unsealed edges under a gloss paint.

Previously finished timber

Painted, varnished, lacquered or waxed woodwork

Character
The preparation depends on what is already there - and its condition. Sound old paint is an excellent base for new paint; a finish that chalks, blisters or flakes must go; and no penetrating finish (oil, hard wax oil, stain) passes through a film.
Specific preparation
Identify the finish (corner-of-a-rag test) and the period (lead before the 1960s); sound paint → wash, key with 180-240, prime the bare patches; failing paint → strip, rinse, 24 h, prime; wax → Wax and Polish Remover, then white spirit; varnish or lacquer under a new lacquer → back to bare wood; under oil or stain → back to bare wood, no exceptions.
Finishes that suit it
Repainting a sound door in Eggshell after keying and priming; re-waxing old pine after stripping the grimy wax; reviving tired shellac with Furniture Cleaner and Reviver, then the rubber.
Avoid
Painting over wax (nothing adheres); oiling over varnish (pale patch); dry-sanding old lead paint.

Recognising the old finish

The corner-of-a-rag test

In a discreet corner, the corner of a rag dampened with a solvent, thirty seconds, and the old finish confesses. Go in order, from the gentlest solvent to the strongest.

Solvent What happens So it is Preparation
White spirit The surface softens, the rag picks up residue Wax Mylands Wax and Polish Remover, 0000 steel wool, white spirit rinse. Nothing adheres to wax.
Methylated spirit The surface turns sticky and dissolves Shellac (French polish) Repairable without stripping: Furniture Cleaner and Reviver then fresh coats with the rubber. Under another finish: removal with spirit and steel wool.
Cellulose thinners The surface wrinkles and dissolves Nitrocellulose lacquer Back to bare wood with thinners and stripper, then sanding, before any penetrating finish; key with 240 under a new compatible lacquer.
None of the three Nothing moves Polyurethane varnish or lacquer, modern paint Sound: key with 180-240 and prime to repaint. Failing, or under oil, stain or hard wax oil: strip completely to bare wood.

The golden rules

What the workshop never negotiates

Four rules professionals apply without thinking - and that are always paid for when forgotten.

01

Safety first

Oily rags soaked in water or spread flat outdoors, never balled up; ventilation and a mask with solvents and MDF dust; gloves for strippers; paint from before the 1960s assumed to contain lead - cold stripping, no dry sanding.

02

You never skip a grit

From 80 to 180, each grit erases the scratches of the one before and only the one before. Skip a grit and the 80 scratches reappear under the stain like white hairs. Always with the grain, always under raking light to check.

03

The climate makes the finish

15 to 25 °C, under 65 % humidity, no draughts. Shellac or lacquer laid on a damp day blooms white; oil laid in the cold does not dry; paint laid in full sun pulls and keeps its brush marks.

04

The offcut before the masterpiece

The whole sequence on an offcut of the same species: that is where you discover that maple stains in patches, that oak blackens under water or that 240 closes the timber to oil. Ten minutes of trial are worth a week of stripping.

Your questions about preparing timber

Do I really need a primer under woodwork paint?

On new, repaired, porous timber or a very different colour, yes, without exception: Multi-Surface Primer & Undercoat seals the base, evens out absorption, gives the key and often saves a whole coat of finish - allow 0.5 L of primer per 1 L of paint. On sound old paint, simply keyed and in a similar shade, it can be kept for the bare patches.

Which grit should I finish sanding with?

The one the finish calls for. 120 to 150 on a floor before hard wax oil; 180 on furniture before oil, stain, paint or shellac; 220 after grain filler and before a lacquer; 240 to 320 for de-nibbing between coats. Finer is not better: beyond 180, bare timber closes and no longer absorbs an oil or a stain.

How do I stop pine knots coming through the paint?

With knotting, applied to every live knot and resin pocket before the undercoat: two thin coats, White Knotting under a pale colour, Patent Knotting under the others. And with patience: freshly sawn softwood bleeds for months; dry, acclimatised timber has almost nothing left to give.

Can I oil or stain a piece that is already varnished?

Not without going back to bare wood. Oil, hard wax oil and stain penetrate; varnish, lacquer and paint form a film they cannot pass through. The slightest island of forgotten film will stay a pale, dry patch. Stripper then complete sanding, dusting, and only then the penetrating finish. To repaint, on the other hand, sound varnish is simply keyed with 180-240 and primed.

Why is my stain blotchy on pine?

Because pine alternates soft earlywood, which drinks the stain, and dense latewood, which refuses it - and a fast-drying spirit stain fixes that difference. Apply a Mylands Water Stain first, softer and more even, which acts as a conditioner; add depth afterwards with a Light Fast. And sand without skipping a grit: stain reveals every scratch.

How long before the room can go back into service?

Touch-dry is not hard. Allow 24 hours of light use then 7 days for a Mylac lacquer or a multi-surface paint; 24 hours in socks and 7 to 10 days without rugs or heavy furniture for a hard wax oil; 12 to 18 hours between oil coats and a week before setting anything damp on it. Shellac is dulled after two days and dislikes hot water all its life.

Timber remembers everything done to it before the finish - and everything that was forgotten.
Sign up to our newsletter

Sign up to our newsletter

Thanks for signing up to our newsletter!